- Introduction to SeqWare
- Installation
-
Getting Started
- Overview
- By the End of This Tutorial
- First Steps
- The Example
- The SeqWare Command Line Interface
- The SeqWare Settings File
- Creating Studies, Experiments, and Samples
- Listing Available Workflows and Their Parameters
- Scheduling a Workflow Run and Monitoring Progress
- The Resulting Structure in MetaDB
- Downloading Workflow Results
- How to Cancel Workflows
- How to Retry Failed and Cancelled Workflows
- Next Steps
- SeqWare Pipeline
- SeqWare MetaDB
- SeqWare Portal
- SeqWare Web Service
- SeqWare Query Engine
- Glossary
- Frequently Asked Questions
- APIs
- Source Code
- Plugins
- Modules
- Advanced Topics
User Tutorial
Overview
Note:This guide assumes you have installed SeqWare already. If you have not, please install SeqWare by either downloading the VirtualBox VM or launching the AMI on the Amazon cloud. See Installation for directions.
The majority of this guide is dedicated to walking users (people who use workflows) through the basics of using SeqWare. The core functionality we will explore is how to get data into the system, how to run workflows someone else created and installed for you, and getting the resulting data back out. We assume that people are most interested in the Pipeline sub-project and focus most of our time on that. The examples below will all be based on a local VirtualBox VM but the environment on our cloud instance is almost identical, so most of the examples below will be applicable to either VM type. Any difference will be pointed out in a tip box.
By the End of This Tutorial
This guide will show you how to use command line tools from Pipeline to access the MetaDB via the Web Service in order to setup workflows to run in Pipeline, watch over them, and get results back. This will allow you to do the following tasks using tools that can be scripted versus our Portal web-based interface that requires a user to click on an interface. By the end of these tutorials you will be able to:
- use command line tools from Pipeline as a workflow user
- create studies, experiments, and samples in the MetaDB
- associate data such as fastq files with particular samples in the MetaDB
- find the list of available workflows and the parameters they accept
- schedule a HelloWorld workflow and monitor its progress
- generate a report on the outputs of your workflows
- download files produced by a workflow
- debug workflows by downloading stdout and stderr for your workflows
- cancel and restart workflows
First Steps
Please launch your local VM in VirtualBox or cloud AMI on Amazon now. For the local VM, login as user seqware, password seqware at this time. Click on the “SeqWare Directory” link on the desktop which will open a terminal to the location where we installed the SeqWare tools.
Alternatively, on the Amazon AMI follow the directions to log in here. Make sure that you launch our VM with the “cc1.4xlarge” instance type. Also, please wait roughly 10 minutes for our startup scripts to run and fully setup your instance.
Once logging into the remote instance you need to “switch user” to seqware, e.g.:
$ sudo su - seqware
In some instances using AWS, it may be necessasry to run sudo umount /dev/xvdc as ubuntu user before switching to seqware user.
Both the VirtualBox VM and Amazon AMI include a start page that links to key information for the VM such as the URLs for the installed Portal, Web Service, key file locations, etc. On the VirtualBox VM, just click the “Start Here” link on the desktop. For the Amazon instance use the instance name provided by the AWS console. For example, it will look similar to:
http://ec2-54-224-22-195.compute-1.amazonaws.com
You fill in your instance DNS name from the Amazon console in place of ec2-54-224-22-195.compute-1.amazonaws.com above. Make sure you check your security group settings to ensure port 80 (and the other ports referenced in the landing page) are open.
The Example
In this tutorial we will use a simple HelloWorld workflow that takes a text file as input and creates another file as output. The same examples could be applied to any workflow and input data types. How to build your own workflows (which is really the central purpose of SeqWare) is covered in the Developer Tutorial. How to install these workflows and present them to users is covered in the Admin Tutorial.
Cloud Tip:Any differences between the local VirtualBox VM and Amazon cloud AMI will be described in a “Cloud Tip” box like this one.
The SeqWare Command Line Interface
The SeqWare command line interface (CLI) will allow you to perform common SeqWare operations, and delegate work to the SeqWare Web service (whether it is on a VM, installed on another local machine/cluster, or in the cloud) that controls workflow execution, among other things.
Tip:You can control which version of SeqWare the CLI will use by setting the SEQWARE_VERSION environment variable, or modifying the associated value at the top of ~/bin/seqware. For released versions, SeqWare will be downloaded automatically from the public repository. If you specify a development release (i.e., suffixed with -SNAPSHOT), it is expected that you have built and installed SeqWare into your local Maven repository. In all cases, the SeqWare JAR will be copied to ~/.seqware/self-installs if it is not already present.
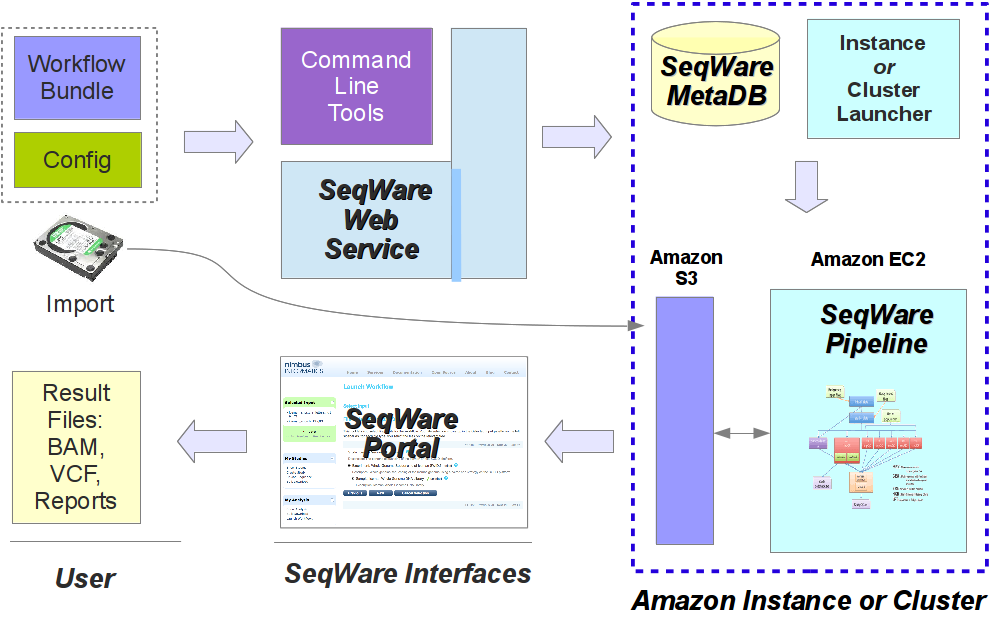
In the image below you get a glimpse of how these SeqWare tools fit together. For users of the SeqWare system the command line tools, Web Service, or web Portal application all provide access to the lifecycle of workflow usage. This includes finding the workflows that are available, seeing what parameters they take, launching a workflow on specified inputs/parameters, monitoring the status, debugging the output if something goes wrong, and getting results back. This process is pretty much identical whether SeqWare is installed locally on a VirtualBox VM, running on a self-contained cloud instances, or a production installation running on a real HPC cluster. In the image below the “Amazon S3” and “Amazon EC2” components can be substituted with a shared NFS fileserver and HPC cluster like a Sun Grid Engine cluster if SeqWare is used on a local, non-cloud infrastructure. Likewise, the whole setup would be installed on a single box if using a VirtualBox VM.
For more information about the command line tools see seqware --help.
The SeqWare Settings File
SeqWare uses a simple configuration file that has been set up for
you already on the VM. By default the location is /home/seqware/.seqware/settings.
This file contains the web address of the SeqWare Web Service, your username and password, Amazon public and private keys that will allow you to push and pull data files to and from the cloud, etc. For this tutorial the config file should be ready to go, you will not need to modify it.
Note:In addition to the settings needed to schedule a workflow run, the provided settings file includes values needed to launch workflow runs and interact with supporting systems. For now, you can safely ignore them.
For more information see the Settings documentation which covers the details on the user config file.
Creating Studies, Experiments, and Samples
This tutorial starts with creating a hierarchy of study, experiment, and sample objects in the SeqWare MetaDB. SeqWare MetaDB lets you track studies, experiment, and samples and then link those to files (like FASTQ or something similar). You can then run workflows on those files, track the resulting files, and use those files for the next workflow.
You can run workflows without metadata writeback to the MetaDB (i.e., without tracking the provenance of output files), but most users will want to associate a run of a workflow with a particular sample, so that is why we start with setting up this information. You will want to set up your study, experiments, and samples before uploading your text or other data files. This ensures you have “parents” to attach these files to. Otherwise you will not be able to use them as parameters for workflows.
Tip:You can use SeqWare Portal to edit the entries you make with the command line tools (or create more studies, experiments, and samples). See the Portal User Guide for more information.
First, you can find out what objects this tool is capable of creating:
$ seqware create --help

Usage: seqware create [--help]
       seqware create <object> [--help]

Description:
  Create new seqware objects (e.g., study).

Objects:
  experiment
  file
  ius
  lane
  sample
  sequencer-run
  study
Now, for a given object, you can find out what fields you need to specify:
$ seqware create study --help

Usage: seqware create study [--help]
       seqware create study --interactive
       seqware create study <fields>

Note: It is strongly recommended that the '--interactive' mode be used when
      possible, since some columns have a dynamic set of allowable values.

Required fields:
  --accession <val>
  --center-name <val>
  --center-project-name <val>
  --description <val>
  --study-type <val>           Dynamic-valued field
  --title <val>
As noted above, the simplest way for a human to enter this data would be to use --interactive option. For now, we will use the scriptable input mechanism:
$ seqware create study --title 'New Test Study' --description 'This is a test description' --accession 'InternalID123' --center-name 'SeqWare' --center-project-name 'SeqWare Test Project' --study-type 4

Created study with SWID: 2
The output of the above command is the SWID or “accession” number that uniquely identifies the object across the database, and is used used to link together objects. For example, you will use the above number to identify the parent for the experiment you create below. If you do not track and supply these numbers then the hierarchy of study/experiment/sample cannot be created.
The next step is to create an experiment and link it to the study you created above:
$ seqware create experiment --title 'New Test Experiment' --description 'This is a test description' --platform-id 26 --study-accession 2

Created experiment with SWID: 3
Again, you use the SWID from the above output in the next step to create an associated sample:
$ seqware create sample --title 'New Test Sample' --description 'This is a test description' --organism-id 26 --experiment-accession 3

Created sample with SWID: 4
At this point you should have a nice study/experiment/sample hierarchy. You can, of course, add multiple samples per experiment and multiple experiments per study. For each of the samples you can now upload one or more files.
Associating Files with a Sample
So far we’ve created multiple objects inside the MetaDB. Now we will create a “file” object that will be associated to the sample (SWID: 4) and reference a location on the file system. First let’s create the input file:
$ echo 'testing HelloWorld' > /datastore/input.txt
Notice that we placed the file inside /datastore so that it can be visible to other users, namely the Portal and MapReduce. See the Portal documentation for
information on setting the shared directory it expects to find uploaded files
in.
Now we can associate that file with a workflow and a run of a workflow (in this case, a stub ‘import’ workflow and a run of it):
$ seqware create workflow --name FileImport --version 1.0 --description description
Added 'FileImport' (SWID: 5)
Created workflow 'FileImport' version 1.0 with SWID: 5

$ seqware create workflow-run  --workflow-accession 5 --file imported_file::text/plain::/datastore/input.txt --parent-accession 4
Created processing with SWID: 7
Created workflow run with SWID: 6
Note that the SWID returned is for a processing event, not the file itself (which has its own SWID). This processing SWID is what will be used below to attach a workflow run into the existing hierarchy.
Tip: you can find a list of the meta types (like `chemical/seq-na-text-gzip` or `text/plain` above) at Module Conventions - Module MIME Types. This is the list we add to as needed when creating new workflows. It is extremely important to be consistent with these since a workflow will not recognize your input unless the meta type string matches what it expects exactly.
Listing Available Workflows and Their Parameters
The next step is to find the available workflows and their parameters. To see the list of available workflows you can execute the following command:
$ seqware workflow list

-[ RECORD 0 ]----+--------------------------------------------------------------------------------------------------
Name             | HelloWorld
Version          | 1.0-SNAPSHOT
Creation Date    | Mon Sep 30 16:58:18 UTC 2013
SeqWare Accession| 1
Bundle Location  | /home/seqware/released-bundles/Workflow_Bundle_HelloWorld_1.0-SNAPSHOT_SeqWare_1.1.0.zip
The list of workflows (just one for now) shows the name, version, and the SWID of the installed workflows. You will use the SWID in the next command to find all the parameters (and their defaults) that this workflow takes:
$ seqware workflow ini --accession 1

Created 'workflow.ini'.
In this example the configurable parameters of workflow “HelloWorld” (SWID: 1) are listed in workflow.ini (you can specify the output file with the --out option). Ini files are based on Java properties file format.
The file conforms to the input you can use to parameterize and launch workflows:
$ cat workflow.ini

#key=input_file:type=file:display=F:display_name=input_file:file_meta_type=text/plain
input_file=${workflow_bundle_dir}/Workflow_Bundle_HelloWorld/1.0-SNAPSHOT/data/input.txt
#key=greeting:type=text:display=T:display_name=Greeting
greeting=Testing
#key=output_dir:type=text:display=F:display_name=output_dir
output_dir=seqware-results
#key=output_prefix:type=text:display=F:display_name=output_prefix
output_prefix=./
Important!: Make sure the file that you create using this tool (and customize for later launching a workflow) includes comment lines starting with “#” and the key=value lines only.
You can customize any values from the key/value pairs that you need to. For example, the most frequent parameters you will customize are input files. In the workflow example above you will want to customize the values of input_file and output_prefix:
input_file=/datastore/input.txt
output_prefix=/datastore/
Since this is a low-level tool you may see many more parameters exposed with this tool than you would using the web Portal application. Please use caution when customizing these values since some refer to items that affect the underlying infrastructure. Generally, when you see display=F that is an indication that the parameter should usually be left as the default value.
Tip: when you customize key-values in the ini file prepared above you do not need to include key-values that you leave unchanged. If you do not include these the workflow will run with those values by default anyway. Removing unchanged key-values will greatly reduce the size of your ini files making it much easier to see the key-values you are interested in. In the example above the minimal ini file is simply the two lines for input_file and output_prefix.
In summary, you should edit the workflow.ini changing it from:
#key=input_file:type=file:display=F:display_name=input_file:file_meta_type=text/plain
input_file=${workflow_bundle_dir}/Workflow_Bundle_HelloWorld/1.0-SNAPSHOT/data/input.txt
#key=greeting:type=text:display=T:display_name=Greeting
greeting=Testing
#key=output_dir:type=text:display=F:display_name=output_dir
output_dir=seqware-results
#key=output_prefix:type=text:display=F:display_name=output_prefix
output_prefix=./
to the following:
input_file=/datastore/input.txt
output_prefix=/datastore/
Scheduling a Workflow Run and Monitoring Progress
At this point you know what workflow you are going to run and you have a customized ini file that contains the input_file and output_prefix. The next step is to schedule the workflow using the ini file you prepared (“schedule” because the actual launching of the workflow will be performed asynchronously by a background process). Make sure you use the correct workflow accession (SWID: 1) and input file accession (SWID: 7).
$ seqware workflow schedule --accession 1 --parent-accession 7 --ini workflow.ini --host `hostname --long`

Created workflow run with SWID: 10
Tip: the accession specifies which workflow to run, and the parent-accession is the SWID of the processing event that associated the input file with the sample. This allows the workflow run to be linked into the study hierarchy. You MUST specify this otherwise the workflow’s results will not be linked to anything (they will be orphaned and will not be visible in the Portal or present in the reports below).
This schedules the workflow to run on the VM. Notice it also prints the workflow run accession which you can use to help monitor the workflow.
You can then monitor workflow progress (and getting a list of the outputs)
using the workflow report command. This will let you script the monitoring
of workflow runs. After about ten minutes, the workflow should complete.
$ seqware workflow report --accession 1
-[ RECORD 0 ]------------------+-------------------------------------
Workflow                       | HelloWorld 1.0-SNAPSHOT
Workflow Run SWID              | 10
Workflow Run Status            | completed
Workflow Run Create Timestamp  | 2013-09-30 17:51:56.547
Workflow Run Host              | master
Workflow Run Working Dir       | /usr/tmp/seqware-oozie/oozie-a6a216c2-0d1b-4ce5-8ea2-08a4ee9a1838
Workflow Run Engine ID         | 0000002-130930164344053-oozie-oozi-W
Library Sample Names           |
Library Sample SWIDs           |
Identity Sample Names          | New Test Sample
Identity Sample SWIDs          | 4
Input File Meta-Types          | text/plain
Input File SWIDs               | 9
Input File Paths               | /datastore/input.txt
Immediate Input File Meta-Types| text/plain
Immediate Input File SWIDs     | 9
Immediate Input File Paths     | /datastore/input.txt
Output File Meta-Types         | text/plain
Output File SWIDs              | 15
Output File Paths              | /datastore/seqware-results/output
Workflow Run Time              | 51.0s
This output includes several columns of interest including the status of the
workflow, the output file types, and their locations. See the --help for more options related to report generation.
The above reports all runs for the specified workflow. Alternately, you can just get the status of a particular workflow-run, e.g.:
seqware workflow-run report --accession 10
You can download the stderr and stdout from the workflow run, which can be useful for debugging failed runs:
seqware workflow-run stderr --accession 10
seqware workflow-run stdout --accession 10
By default this command automatically creates output files for stderr and stdout, for example 20130930_175543__workflowrun_8_STDERR.csv. You can use the –out option if you wish to specify the file name.
The Resulting Structure in MetaDB
After a few minutes the HelloWorld workflow run should be complete with a status of “completed”. If you have followed the directions carefully for creating a study, experiment, sample, and file in the MetaDB, and running a workflow you should have a structure very similar to the following present in the MetaDB:
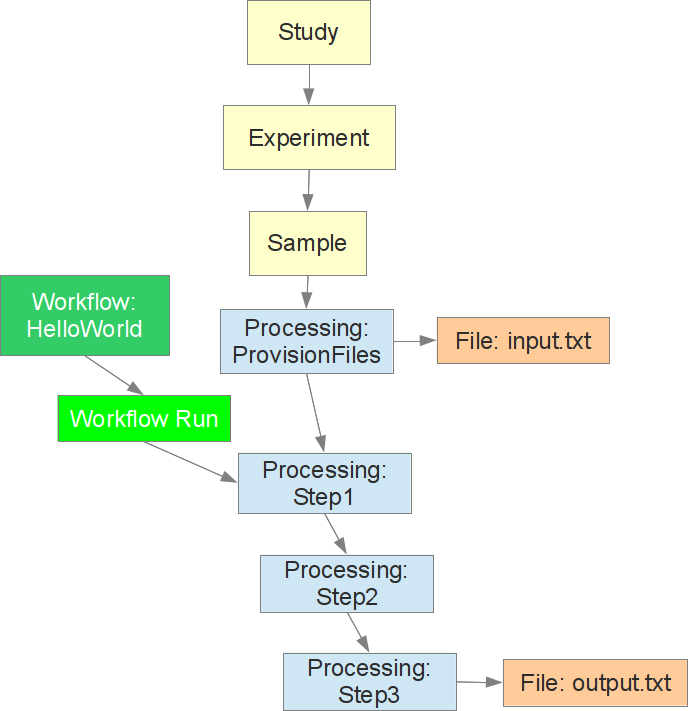
You can see the study, experiment, and sample linked together along with a file processing event attached directly to the sample. This event is associated with the input.txt file and it is the parent of the first step in the HelloWorld workflow run. This workflow run has three steps in this example and the final step is associated to the output file output.txt. The processing event for Step3 could then go on to become the parent for a subsequent workflow.
For a more detailed explination of the SeqWare MetaDB and the relationships it encodes please see the MetaDB Documentation. You can use either the Portal or various reporting tools available in the Pipeline and/or Web Service to explore the data structures and files created when running workflows.
Downloading Workflow Results
Once a workflow has finished running you will want to list out the associated output files and download the results. While you can use the Portal for downloading files the best way to get files in bulk is to use our reporting tool. This produces a tab-delimited file that lists all the files produced for the workflows you are interested in. Since the report produces a simple tab-delimited file you can easily automate the downloading of results by looping over the output files.
First, you need to populate the file provenance report. You may wish to add the following command to a cron on an interval depending on the size of your database and the number of workflows that you run.
seqware files refresh
Then you can download the report. Note that while this example filters by study name, there are a large number of filters that can be used.
seqware files report --study-name 'New Test Study'
The output is a Comma-Separated Values file that contains a line for each file output for this workflow.
Output files provisioned to S3
If the workflow run was configured to place output files in S3, you can use the file URLs in the report (such as s3://bucket/samplename/test_R1.text.gz) to download results. In the local VM they are just local files so they do not need to be copied. Here is an example, though, of how to download a report bundle that is hosted on Amazon’s S3:
$ seqware copy s3://bucket/results/seqware-0.10.0_ComprehensiveExomeGenomeAnalysis-0.10.5/59491657/GAG.fa.variant_quality.gatk.hg19.report.zip /home/seqware
Here the zip report bundle is downloaded to the seqware home directory. In this way you can pull back the results of workflows entirely through scripts.
Also note the study report gives you SWIDs for processing events and entities such as studies, samples, and experiments. You can use this report to find these SWIDs that are used as “parents” for subsequent workflow runs.
You can find more information on this report tool by running the following command:
$ seqware files report --help
How to Cancel Workflows
After launching a workflow, you can cancel it in order to stop further execution. This will set the status of the workflow run to submitted_cancel, and after the next status propagation, will set the status to cancelled.
$ seqware workflow-run cancel --accession 28
$ seqware workflow-run report --accession 28
-[ RECORD 0 ]------------------+-------------------------------------
Workflow                       | HelloWorld 1.0-SNAPSHOT
Workflow Run SWID              | 28
Workflow Run Status            | cancelled
Workflow Run Create Timestamp  | 2013-08-23 14:58:35.374
Workflow Run Host              | master
Workflow Run Status Command    | 0000000-130823144527997-oozie-oozi-W
Library Sample Names           |
Library Sample SWIDs           |
Identity Sample Names          |
Identity Sample SWIDs          |
Input File Meta-Types          |
Input File SWIDs               |
Input File Paths               |
Immediate Input File Meta-Types|
Immediate Input File SWIDs     |
Immediate Input File Paths     |
Output File Meta-Types         |
Output File SWIDs              |
Output File Paths              |
Workflow Run Time              | 33.0s
How to Retry Failed and Cancelled Workflows
If a workflow has failed due to a transient error (such as cluster downtime or a disk quota being reached), you can restart a workflow at the last failed step.
$ seqware workflow-run retry --accession 28
Alternately, you can retry workflow runs directly in HUE (this will also give more fine-grained control over which jobs should be rerun). Note that status checking is normally skipped for failed/cancelled runs, thus SeqWare will need to be informed that the run has been retried externally:
$ seqware workflow-run propagate-statuses --accession 28
As with the cancel case, the status is first set to submitted_retry, and after the next status propagation will be set to running (or whatever status is appropriate).
Next Steps
See the Developer Tutorial for how to create a new workflow. How to install workflows and present them to users is covered in the Admin Tutorial.