Installation
Environment
SeqWare is designed to work in a 64-bit Linux environment, we do not support Windows or MacOS. You can still use SeqWare on your local Mac or Windows PC through virtualization software. You need to be comfortable with Linux before moving forward with SeqWare, specifically the Bash shell, using an editor like vim or emacs, and some experience programming in Java is extremely helpful.
To learn about Linux, the Bash shell, and Java we recommend the O’Reilly series of books:
Option 1 - Client Only
This is the option for you if your environment already has a SeqWare installation and you just want to download the client tool for interacting with the system. It lets you generate reports, write new workflows, install those workflows on the remote SeqWare system, schedule workflows remotely, etc. Keep in mind most sites do not have SeqWare already configured and you will typically always want to use Options 1 or 2 below instead.
To install the client only, first download the command line SeqWare tool to a location in your path (make sure you mark it as executable). Next, copy the archetype-catalog.xml file to you ~/.m2 directory. This assumes you have Maven 3.x installed and are running in a Linux environment. The SeqWare command line will automatically download the latest SeqWare release and create a basic ~/.seqware/settings file when you first run it. Keep in mind you will need to get various settings for your ~/.seqware/settings file from the person who set it up your SeqWare install.
You can find the SeqWare command line tool and the archetype-catalog.xml on our releases GitHub page.
Option 2 - Installing with a Local VM
We have created a VirtualBox VM with all SeqWare projects pre-installed along with some sample data. This is the easiest way to get started with SeqWare since it requires no installation and configuration on your part. While the download is pretty large, you will not incur per hour fees as you do when running on Amazon so it is a great way to get started with SeqWare, kick the tires, and see if this is something you want to use.
Getting the VM
Getting the local VM is a two-step process. First, download (or install via your OS’s package management system) the VirtualBox application. This is a great piece of software that will let you run the SeqWare Ubuntu VM on whatever OS you currently have.
Next, you will need to download our current VM image which is linked below. Please make sure you are using the latest version, when we post a new one we will tweet about it so consider following us on Twitter.
- SeqWare_1.1.0.ova
- SeqWare-1.0.13.ova (this is the VM we recommend for the ICGC PanCancer project for data train 2.0)
If you run into issues downloading the VM, please try wget and use md5sum to verify your download. For example:
$ wget https://s3.amazonaws.com/oicr.vm/public/seqware_1.1.0-beta.0.ova
--2015-01-23 11:40:31--  https://s3.amazonaws.com/oicr.vm/public/seqware_1.1.0-beta.0.ova
Resolving s3.amazonaws.com (s3.amazonaws.com)... 54.231.17.200
Connecting to s3.amazonaws.com (s3.amazonaws.com)|54.231.17.200|:443... connected.
HTTP request sent, awaiting response... 200 OK
Length: 2644320768 (2.5G) [application/octet-stream]
Saving to: `seqware_1.1.0-beta.0.ova'

100%[==========================================================================================>] 2,644,320,768     15.6M/s   in 3m 26s

2015-01-23 11:44:01 (12.2 MB/s) - `seqware_1.1.0-beta.0.ova' saved [2644320768/2644320768]

$ md5sum seqware_1.1.0-beta.0.ova
107b75726de602750e1f82f84f0b20f5  seqware_1.1.0-beta.0.ova
Open VirtualBox and use the “Import Appliance” tool to create a new SeqWare VM on your system. Make sure you set the memory to the max you can afford, I recommend at least 12GB of memory for the VM. You can then launch it and you will be presented with a fairly standard Linux desktop with links to the project documentation to give you an idea of where to begin (the “Getting Started” guide here provides a walk-through of using this VM).
Note: When you import the VM ensure that “Reinitialize the MAC address of all network cards” is NOT checked. (Why?)
Note: When you import the VM you need to set your memory and CPU correctly. Do not over-commit resources (especially memory) since that will cause the machine to “swap” memory to disk and slow your computer to a crawl. This VM is intended for you to see SeqWare in action and then create your own workflows. If you are making a workflow that will take 16GB of memory then you will need a VM running on a machine that can afford to give 16GB of memory to VirtualBox. Also, we only distribute 64-bit VMs which all modern PCs will support and VirtualBox makes use of various virtualization extensions which most modern PCs support (but you may want to check with your computer vendor).
Logging In
The login username is vagrant and the password is vagrant. If you need to become root use sudo bash. You will initially login as the vagrant user and will then switch to the seqware user which has been setup with our utilities.
By default the VM will open port 2222 for ssh. You can connect to the running VM from an external console using the following command:
sshpass -p 'vagrant' ssh -p 2222 vagrant@localhost
sudo -u seqware -i
Note: Obviously, you will not want to run this VM anywhere that is network-accessible. If you do, make sure to disable the above login and use SSH keys.
What Can You Do With It?
As the note above mentioned, you can use this VM to see what each of the SeqWare tools can do, kick the tires, explore the docs more, etc. If you decide to use SeqWare then this VM can also be your development and testing environment for workflows. Once you have created and tested a given workflow, you can also use the SeqWare commands on this machine to “install” the workflow bundle into a production system. Or you can even hook up this VM to a real local grid environment (such as an SGE cluster) for running workflows. This is exactly what we did at OICR, our SeqWare hosts are all virtual machines that can submit workflow jobs to our physical cluster. You can find more information on this in the “SeqWare Pipeline” section of our documentation.
Option 3 -Installing with a Cloud VM
We currently support running SeqWare on the Amazon cloud on HPC nodes. These are high-performance, cluster-compute nodes well suited for research, for specs see Cluster Compute Quadruple Extra Large Instance. These machines provide 23GB of memory and 2x quad core “Nehalem” processors which is typically sufficient for analyzing a human exome within about 4 hours depending on the specifics of your workflows.
For development purposes, we have also have had success with m3.xlarge instances. For noninteractive build and integration tests, we have also had success with the m3.medium instance type. However, note that these instance types are not recommended for production use.
If you are interested in building complete clusters on the Amazon cloud please see Option 4 below. Even for single-node SeqWare deployments Option 4 provides more control and a greater diversity of instance types for running. However, just launching an AMI as described in this option is extremely fast and easy, it is really the best way to explore SeqWare with the least amount of work.
Getting an Amazon Cloud Account
To use Amazon’s cloud (also know as Amazon Web Services or AWS) you need to sign up for an account and that requires a credit card. Also, while launching these instances is simply point and click using Amazon’s very nice AWS console, actually using these machines requires the same level of experience as using the local VM above. If you are looking for a completely graphical, web-based service you should consider using one of the cloud-based providers like Nimbus Informatics or DNAnexus.
Signup for the Amazon cloud here
Running the VM
What makes AWS EC2 so amazingly awesome is its excellent support for both graphical UIs and programmatic APIs for controlling the cloud. It is your choice on how you want to launch the VM, either through the console or via one of the many command line and programmatic tools available. The details are subject to change so we refer to Amazon’s thorough documentation. Specifically this guide should be very helpful in learning how to use Linux VMs on Amazon’s cloud.
Unstable Public AMI(s):
- ami-9c6b05f4 : 20141223 (SeqWare-1.1.0-beta.0) Make sure you launch in Virginia and select the instance type “m3.xlarge” since the AMI is designed specifically to work with this type (we configure SGE based on the CPU and memory of this instance).
- ami-c82c80bf : 20141015 (SeqWare-1.1.0-alpha.4, Bindle 2.0-alpha.1 (d)) Make sure you launch in Ireland and select the instance type “m3.2xlarge” since the AMI is designed specifically to work with this type (we configure SGE based on the CPU and memory of this instance).
- ami-c8e55da0 : 20141015 (SeqWare-1.1.0-alpha.4, Bindle 2.0-alpha.1 (d)) Make sure you launch in Virginia and select the instance type “m1.xlarge” since the AMI is designed specifically to work with this type (we configure SGE based on the CPU and memory of this instance).
An example of the launching wizard in the Amazon AWS console can be seen below:
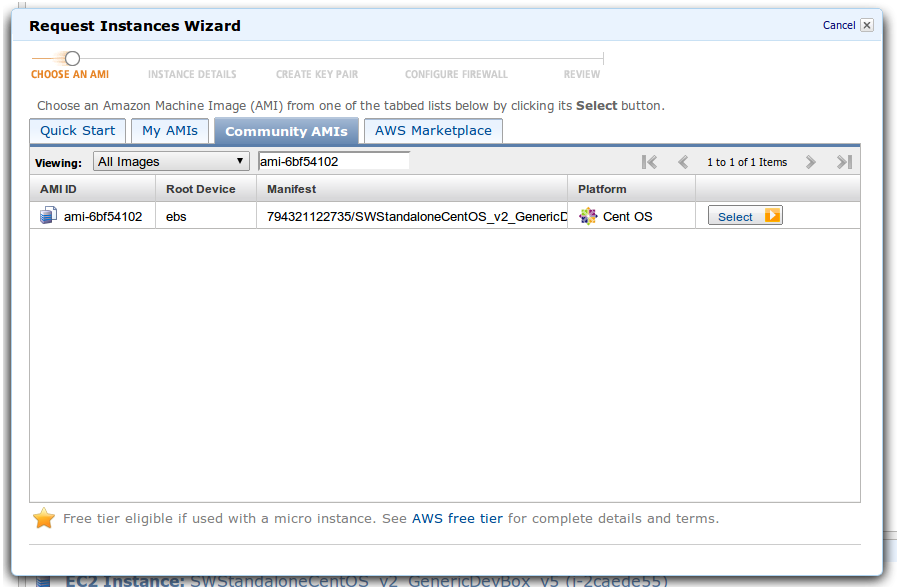
Tip:Make sure you open port 22 for SSH, port 8080 for the SeqWare Portal and Web Service, and port 80 for our landing page that you can access at http://ec2hostname/, you fill in ec2hostname with the name of the server Amazon provisions for you.
Note: Note that Amazon may attempt to mount an ephemeral disk “on top” of part of our installation. Either disable all ephermeral storage on the “Add storage” screen or run the following command when you first login. sudo umount /mnt
Logging In
There is no graphical desktop to log into. Instead you will need to follow the directions on the Amazon site for using ssh to log into your running VM. There you will have a command line interface to interact with the SeqWare tools. You can also view the SeqWare Portal and SeqWare Web Service remotely in your browser if you have previously opened the ports 22, 8080, and 80.
Specifically, follow this Amazon guide for logging into your SeqWare instance using ssh.
You will want to login as the “ubuntu” user, use “sudo umount /mnt” to disable any ephemeral drives, and then use “sudo -u seqware -i” to become the SeqWare user and walk through the steps of the tutorials. dd
What Can You Do With It?
You can launch this public AMI which will give you a server with all the SeqWare projects pre-configured and loaded with some small examples. You can then use the running VM to test workflows and write your own. Since this VM runs on the fairly powerful HPC node type, you can actually use it to get real work done. This instance is powerful enough to analyze a whole human exome in 4-8 hours and you can, of course, launch many instances simultaneously to process multiple exomes in parallel. Future releases of SeqWare will include scripts to setup clusters of HPC nodes that will allow you to process whole human genomes. In the mean time we recommend investigating the excellent StarCluster cluster launching tool.
Note:Keep in mind Amazon charges approximately $1.30 USD per hour to run these instances, it is your responsibility to monitor your cloud usage and turn your VMs off when not in use! You will be billed for each hour (rounded up).
Option 4 - Installing from Scratch
Note:We do not recommend you attempt to do this unless you a familiar with Linux and a cloud/virtualization technology such as VirtualBox, OpenStack, Google Compute Engine, or Amazon Web Services.
Follow the instructions at Bindle.
Next Steps
Now that you have seen how to launch either a local or cloud-based SeqWare instance follow the ”Getting Started” guide to see how to run the sample HelloWorld workflow.